Exposed treats like apples and such are not appreciated by strangers much. All the trouble you go through today will just be taken and thrown away. You protect your kids more than any other and so will that little trick or treaters mother. So throughout the next week and month or so, I will show you samples of whats good to go. Using vintage freebies from my freebie page we will create treats that will be all the rage. So stay tuned my friend for Halloween fun there's so much more in the days to come. One more thing before I go, I must tell you I appreciate you more than you know!  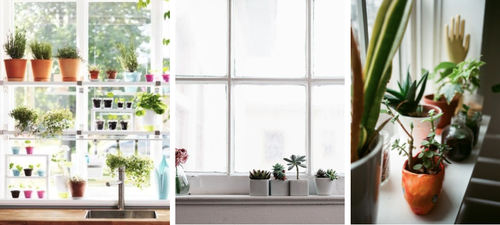 Over the next few days I am going to cover the lost art of Apothecary. You see many years ago we; well not you or I but our bygone relatives did, made their own soaps and shampoos, medicines and so much more. Over the years we have let the big corporations take over this. Why? Well it is much easier to go out and buy a bottle of something then it is to create it right? The issues with that though are many. I don't know about you but I can't afford to buy every product I want or see anymore. Not to mention of course the amount of chemicals in them that we keep introducing to our bodies. It's no wonder people are getting more chronic illnesses because we keep getting away from nature and the natural things that made our ancestors strong like bulls. Believe it or not we are one with nature. We are part of it and yet we keep building concrete jungles to separate ourselves from it. This first edition of the Artful Apothecary is going to cover building your own windowsill herb garden so you too can be an urbanite farmer. Now let me tell you that in Georgia the ground is mostly red clay. It makes for long hours of using a pick or machinery to dig through it and then you have to go out and buy black dirt and other things like manure to mix with it because nothing of any quality will grow in the red clay. Not to mention a person with disabilities like myself just can't handle the heat and the drudgery. But I would still like to reap the rewards of fresh herbs for my Apothecary concoctions. This makes a windowsill garden prime real-estate. How ever before we get started a word of warning to cat owners such as myself. Cats love to dig in these gardens and chomp on the leaves. Be sure you do not plant anything poisonous to harm kitty. Or you can create a window sill box that Kitty can't get into. May I suggest planting greens just for kitty that you keep at his/her level to help discourage them from getting into yours. Here is a link to ASPCA's 19 of the most common poisonous plants for cats: http://www.aspca.org/pet-care/animal-poison-control/17-poisonous-plants  Ok now that we have covered Kitty and thankfully to our diligence its' not with dirt. We will move on to the windowsill garden. Above I showed you a picture of some sample ideas for your window garden. Below there are some additional ideas. You do not have to have separate containers for each and every herb and to be honest if you have the room to make one bed like the photo below left, it will be the easiest because it will stay moist longer and require a little less care. Just make sure you mark what each plant type is if you do this and do keep them trimmed back.  You can use anything for containers. Plants are not too fussy but do require proper drainage. You can achieve this by making sure you have a couple of small holes in your containers at the bottom or add rocks to cover the bottom then cover with dirt. The reason for the drainage is to ensure water doesn't stay pooled around your roots so they don't get root rot and also to discourage mold growth. I have created a slide video below of some fun planter ideas and a lot of them are Kitty focused.
Medicinal herbs are among the most rewarding of garden projects, providing both a dose of aromatherapy and the materials to make high-quality, cost-effective herbal products. Plus nurturing and talking to plants and making your own remedies are healing activities in themselves. Depending on how fast you want to grow your garden will determine how you should go about it. If you start from seed it could be a year before some of your plants are ready to yield so it's best to begin with a nursery transplant. Start your own apothecary garden with plants such as lavender, chamomile, mint, lemon balm, rosemary and thyme -- and make remedies for stress, digestion, immunity, and more. Read up about each of your herbs because some of them like to take over a garden like mint. So now that you have a project to do, go forth and build your gardens with confidence. The next edition will discuss harvesting your herbs and drying as well as some ideas of how to use your herbs for medicinal purposes. The third edition will cover 4 Steps for Creating Your Own Apothecary, including presentation, bottling and label ideas. I will of course include some recipes too so don't miss the next addition in the Artful Apothecary. 
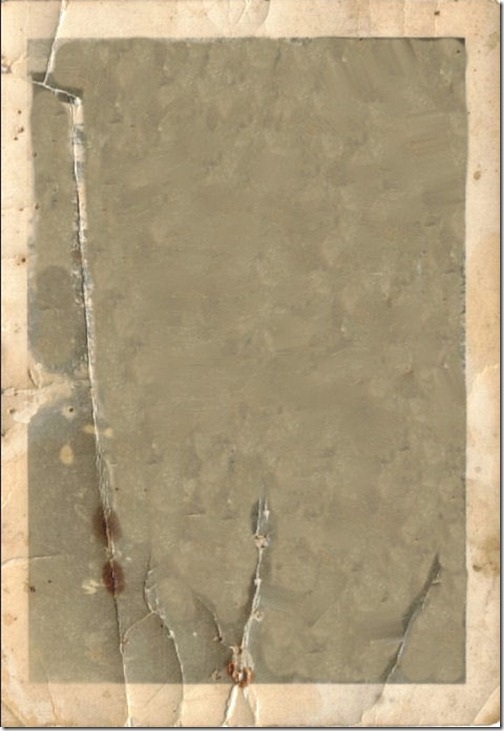
So is it an art to create Vintage photos? Well yes but it doesn't have to be. This photo I did of Tom Cruise took me about 15 minutes. And I am quite happy with the results. Below I will tell you what you need if you want to create something like the Tom Cruise photo. Why Tom Cruise? He is gorgeous...I don't think I need any other reason and he looks awesome in vintage. Ok so here is what you will need. You will have to have some kind of photo editing software and happily there are free ones out there. The cool thing is I didn't use any advanced tools in any of the programs. Anyone should be able to do this. You can download Adobe Photoshop for a free trial, or download Gimp, (which I find to be a bit non user friendly) but there are many out there just google free Photoshop programs. They will need to be able to erase, airbrush and create layers. The Tom cruise vintage photo was done with 3 layers. The original photo, a piece of digital grunge paper, and an old tin type frame. That's it. You can find these items again by doing a simple search on google. When typing in "Grunge Paper" to Google there are many choices. This is one that I found cool.
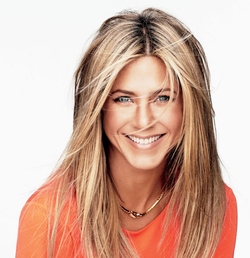
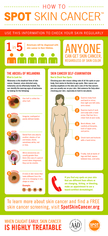
Now that we have our three images we need to meld them together. You want to start a "New" Image in your chosen program under the top left corner menu choice of "file". I chose a 8X10 inch format and 150 DPI if your program asks. DPI is the resolution in "dots per inch" The higher that resolution the better your print outs will be but 300DPI is HUGE and you will probably only need 150 or less. Images on the net are usually set at 72 DPI. The reason I choose an 8X10" size is so that I have room to move things around and work just like a table. I can crop it later using a simple cropping tool. Now you want to open each of your images into 3 different layers. As shown in the red circle below. 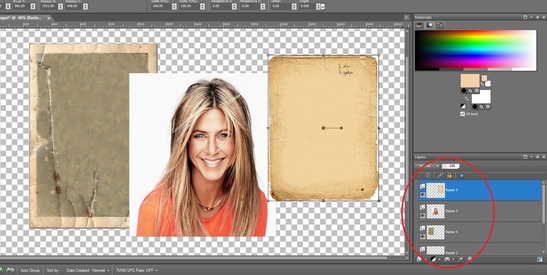 By clicking on the layers you want and then right clicking you should be able to alter them. We want to take our Grunge paper layer and make is 50% transparent. 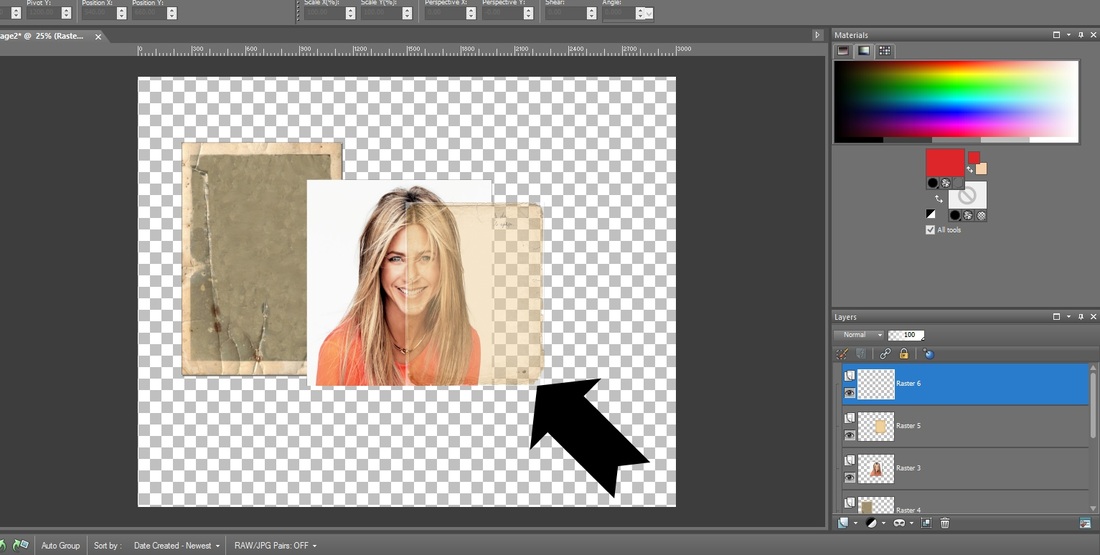 You can see that by pushing the now 50% transparent layer over the top of Jenn's photo she already is starting to look vintage. WOOT! Now you will do just that. Take that transparent layer and move it completely over the photo. Now usually I would never adjust an image from the sides but in this case since we want the grunge paper to give our photo that look we don't have to worry about stretching it out of shape. So go ahead and do just that. Grabbing from the corners and sides adjust that image over the top of your photo until the corners match up. It should now look something like this: 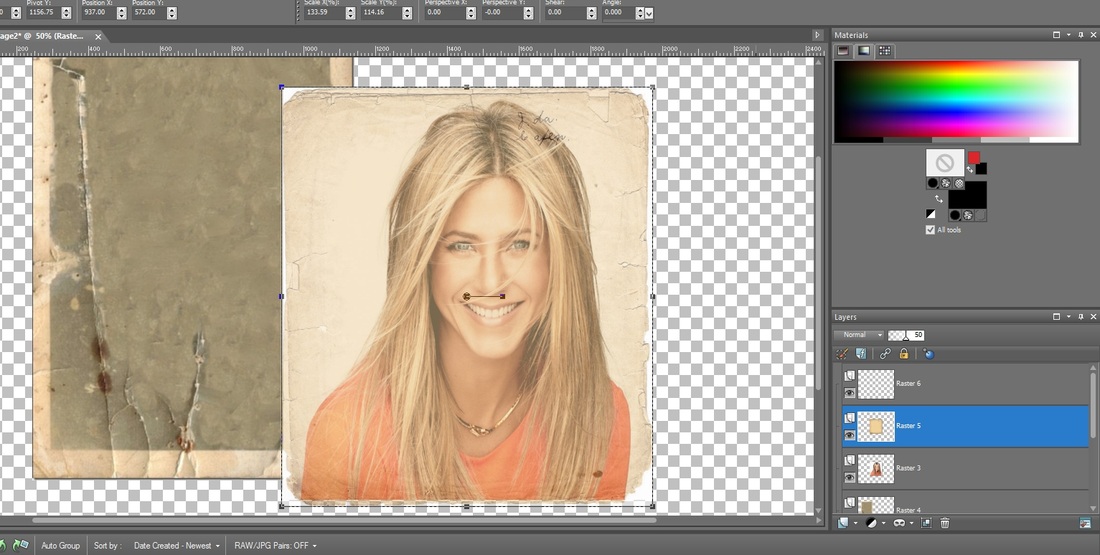 At this point you can leave it like it is or if you want it to look more vintage you will need to adjust your actual photo to a black and white image. I am going to go ahead and do that and then I will merge these 2 layers together by right clicking on the grunge layer and merging it down on top of Jen's now black and white photo. Be careful not to merge the wrong layers, you can move them up and down by dragging them in the layer panel. Then I will take my eraser tool and start erasing the white edges that are showing down to the grunge edge. Yes there are better ways to do this but this is a simple tutorial. Here is the black and white merged with the grunge and the eraser tool showing: 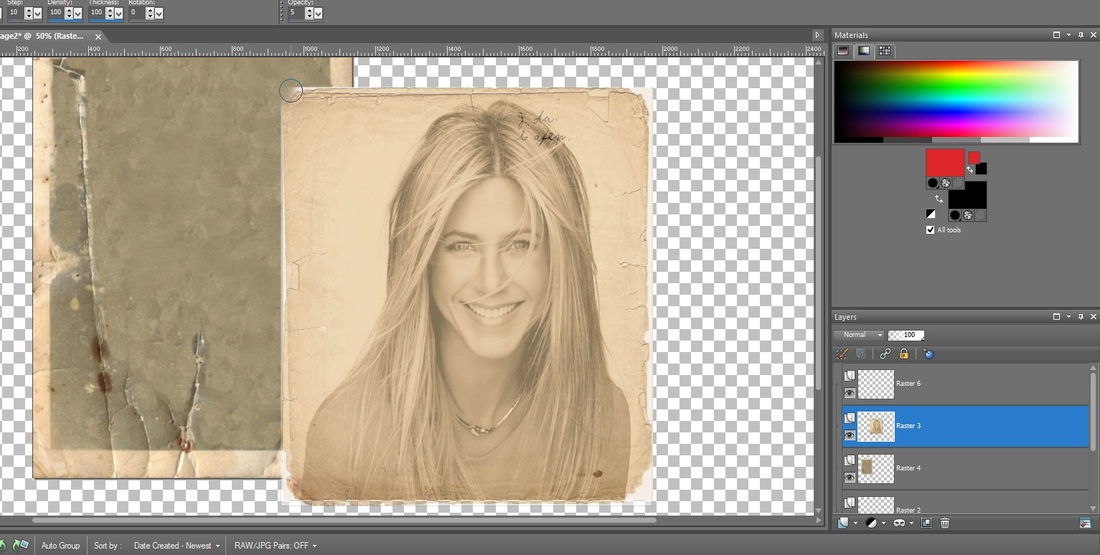 Looking very vintage already yes? Ok now in my case the image I chose doesn't match up with the final Polaroid image. We can't stretch the Jenn Image from the sides because it would alter her face. We can size her properly from the corner but the Polaroid will still be a bad match up so what we do is stretch our Polaroid to fit because like the grunge layer we wont really see it in the end. I am also going to take my Jenn photo layer and make it 90% transparent. Why? Because I want to be able to see some of the cracks and stains on my final image. I will then take the eraser tool and lightly erase just a few of the grunge edges so the Polaroid will show through; this will also give it the dark vintage edge. I also did a little erasing of the Grunge layer over the cracks of the Polaroid so that you can see the tear cutting through the bottom. You can do two things now; darken the edges of the inner Polaroid with a black airbrush to darken it up further for your edges or just merge your layers now and crop your photo. I did not use the airbrush on this one BTW. And here is the final product: 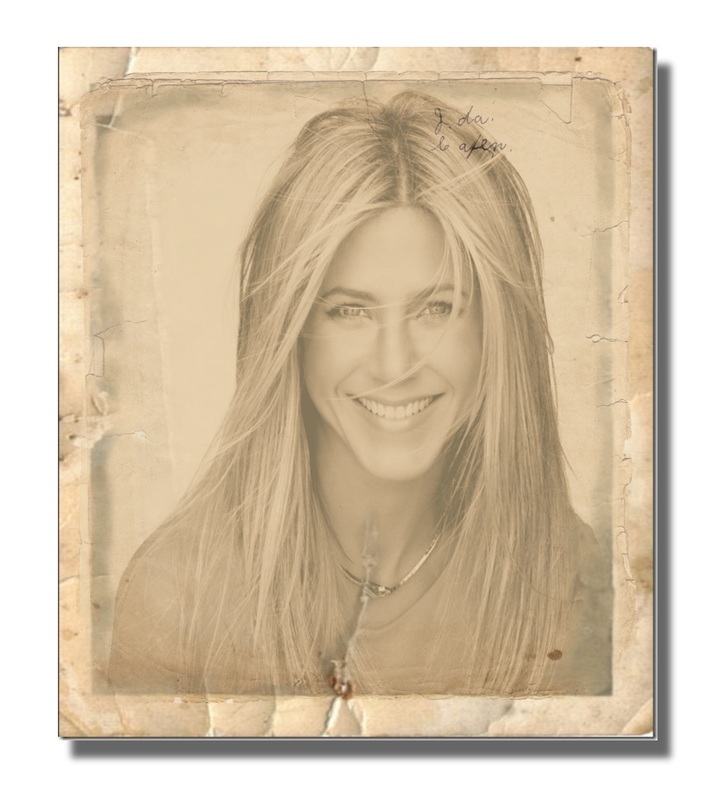 Pretty nifty huh? And done in less then a half hour with the tutorial but once you get good at it, it will take less then 15 minutes. Super fun. Now go forth; now that you understand the "Art of Vintage Photo Creation" go do your wedding photos! Make sure to upload them to our DIY page we would love to see what you did! Have a great time!   So quite a few years back I noticed a spot that kind of looked like a mole under my left eye. Then the mole grew and it kind of looked blisterish. I went in to the dermatologist and lo and behold skin cancer. The big C word. Now to be honest I do not panic when they tell me things like this. Why? Because honestly no one gets out of this life alive and SOMETHING is going to get you one way or another. I find both the humor and the beauty in it. Because out of death grows new life and how odd to know everything will continue the same when I am gone. I can only hope that I have a positive effect on those around me and continue to reach out and touch the world before I check out. But check out time isn't until later and luckily enough it was Basil Cancer on my face and not a Melanoma. So what do they do with Basil Cancer? They cut it out and try to make sure they get the skin around it too. So there I was laying on the operation table wide awake with a local stuck all around this growth. I did tell you it was under my eye didn't I? And just left slightly down from the bridge of my nose. I could hear the cutting through skin as the skilled plastic surgeon slipped the scalpel into my face. Sort of an odd scraping noise. She cut a little triangle portion out and then expertly sewed it back together with instructions on how to avoid scarring. Can you see a scar? Yep barely and mostly if I point it out. But I think that's the beauty of a scar isn't it? It shows we are not indefectible. Sometimes the flaws make a face more beautiful and real both in art or movies. Look at Brad Pitt for instance. Beautiful. Gorgeous walking art work and guess what? He has a scar under his left eye too. From what you may ask? Briefly, he was in junior high when he got hit in the eye with a baseball. Sixteen stitches. I only had three. Anyway the point is the human body is gorgeous with its flaws and non-imperviousness. Because we are not perfect and because we have flaws we are beautiful one of a kind creations. However scars may be ok but Cancer is not. Not in any form. As a matter of fact because I was so severely burned by the sun many years ago I have lot of watching to do on my skin. I thought I would share with you today how I have to check my skin over for Skin Cancer periodically and I may currently have some spots again. My hope here is to make you aware of how bad the sun is for your skin as well as maybe educate you to a new place you never thought you should look for Cancer. Now I know you know how bad the sun is for your skin. More than likely your mom harped you about it growing up. For good reason. I knew a woman who had cancer so severely on her nose that it looked carved up like a Thanksgiving turkey when they removed it all. Beautiful to me? Yes, to others? maybe not so much. So lets try and avoid that shall we? First I have a really cool free PDF for you that you can download. It goes over how to check your body for skin cancer. Cool right?
|
About this page.
Life in general is an art and I will show you how to find the beauty in everything you see and do. Subscribe and receive a free weekly download and updates. Archives
May 2019
Categories
All
Are you able to donate a $1 through PayPal to help assist this artist in keeping this extensive site alive. It is all out of pocket and costs over $50 a month to finance. If you enjoy this site it would really help. Thanks in advance! |
||||||||||||||||||||


 RSS Feed

|
|
©1996-2022 GrafXQuest LLC All Rights Reserved.
|
|