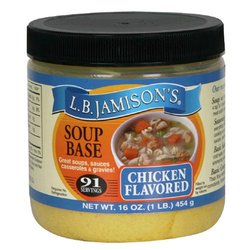
you do in life is an art. You don't have to be able to paint or draw, just have the artistic eye to find the beauty and grace in everything. Even if its' the fact that you can put you pants on better than anyone else. There is even a certain grace in getting dressed. Ok I digress but its true; life is art and art is life. With that in mind this is how I make my soups. I don't follow rescipes but more like splash color in a pot. The first thing I do when determining what kind of soup I want to make is determine a theme. I wanted chicken soup because it makes me feel better and Rosemary not only because I love it but with a cold my sense of smell and taste is of course effected and the Rosemary is pungent enough to be able to taste. Because I make soup like I paint. A bit of that and a bit of this I will do my best to put it into a recipe for you. In your Crock: Small crock? Or large? Add water* to slightly over half of the crock. Next you will add chicken bullion or *replace water with Chicken soup stock. I have only used chicken stock once or twice and find it to be too bland for my taste. When I lived in the Chicago I was able to find this wonderful soup base called L.B. Jamison's that is more a paste then a bullion. Unfortunately I can't find it in the south but I did find it on Amazon and now buy 6 jars at once to have on hand. I can't live without this stuff! I add approximately 2 heaping tablespoons to the water and 3 to four for the larger crock. You can add more later if its needed by spooning and mixing it in. http://amzn.to/1AUdxsi
Broiling the breasts to near finish leave them slightly pink as it will finish cooking in the crock. After taking out of the broiler let it set for five minutes before cubing. This is to keep the chicken juicy and moist. Add to the crock. In the crock with the soup base I added: Two fresh tomatoes washed and diced. 1 large sprig of fresh rosemary from the bush I planted outside my home. Now you can use fresh from the store or if you do not have fresh rosemary growing you can use 2 tablespoons of dried rosemary. I did not cut the rosemary off the stem as you will remove the rosemary sprig from the soup about halfway through cooking. If any comes off the stem into the soup that is perfectly fine. The juice of one fresh lemon or two tablespoons of real lemon juice. One tablespoon of parsley fresh or dried. 1 teaspoon of thyme, and sage. Now take a whiff of these wonderful spices. Wonderful and goes with the theme. Anything else you want to ass you can! Remember there is no right or wrong in making soup. I also added about a teaspoon of celery salt. Next I took a whole onion, four carrots and three stalks of celery. Chopped them to a small/medium size and sauteed them in olive oil over med heat. The idea is to cook them down a little bit to help the cooking process go faster. When the onions start to turn clear at the edges, remove from heat and add contents of skillet to crock. I then added one can of chick peas and one cup of tomato juice. The tomato juice is only because I had about a cup left and didn't want to waste it so added it to the soup. You don't have to add this if you do not want, but if you like to have a slight tomato base; which goes great with the rosemary and lemon, you can use one can of chopped tomatoes having the same effect. Be sure if you do though to substitute it for the fresh cut tomatoes. Now you can pretty much add anything you want at this point some frozen peas and corn too. I added both. Ok then! Everything added? Great next cover your crock and let it do its thing. About 3 hours in test the broth. Determine if the Rosemary as infused your soup if so you may now remove it. You can also add more bullion/base at this point if needed. Once your soup comes to a boil you can add rice, or macaroni. I added 1 cup of dry macaroni noodles. Adding it un~cooked will do a couple of things. The vitamins in the noodles/rice wont be rinsed off by cooking it separately and the starch will help to thicken your soup slightly giving it a chunkier texture. Your soup is done when your carrots are soft and your noodles and or rice are cooked. Serve with a fresh sprig or rosemary on top and a grilled cheese sand-which or crackers! Makes about 6-8 good size servings. Tips:

0 Comments
 As promised here is the delicious Witches Candy Corn brew recipe. Kid safe and fun for everyone. Get on your brooms and lets go for a ride and some fun! First off depending on the event you plan on throwing will determine how many you make. The great thing about this recipe is that you pretty much make it by the glass so easy peasy! Lets start with the Black sugar rimmed glasses then the brew and last the cute little witches broom added for flair. First deciding how many glasses is important. The best and most fun thing to do for the brew is to use mason jars or mason jars with handles as you want to be able to see your brew. The foam on top is very special! So after decided on what clear glasses you will use lets move on to the black sugar you will rim your glasses with. Now just a heads up we are going to make our own because people out there are charging an arm and a leg for it and guess what? Its easy to make! Lets make a trip to the Craft store and while there you will pick up the following items in the baking aisle: Sanding Sugar and black powdered food coloring. You want to use the powdered kind because its less messy and its ready to go right away. No drying time. You will also need a plastic baggie that zip seals.
Now just a tip on the Black food coloring. Trying to mix powdered food colors like red, green etc... to make black will often produce a dark gray color. Pre-made black food coloring is the best choice for this. So buy yours early before they run out. The closer to Halloween the shorter on the supplies. Next on to the Candy Corn brew. The brew is actually made of a couple of layers. Here are the ingredients: 2 Liters of Ginger ale 1 Liter Mango Nectar (you can get this in cans in the Hispanic section of grocery or in the health section in the refrigerated drink area). 1 Bottle Grenadine 1 Long Eyedropper Scissors 1 Cup Heavy Whipping Cream 2 Tbsp Of Sugar 2 Tsp of unflavored gelatin (careful on this one in case you are serving a vegan) Enough Long Cinnamon sticks to supply each glass with one Black paper cupcake liners Corn Syrup bowl from dipping sugar above Lets go ahead and make our brooms so they have time to set up. Taking a black cup cake liner make a cut into it to the center. Insert your cinnamon stick, leaving about a half inch, into the back side of the liner. Dipping your finger in the corn-syrup bowl paste some around the 1/2" end of the cinnamon stick to "glue" down your cup cake liner. Use the photo above for reference. Pinch and twist your liner around the end of the cinnamon stick to achieve a triangular appearance. Use syrup as needed to paste your ends to meet. Then taking your scissor cut fringe on the end of the cup cake liner to emulate broom bristles. Set your completed brooms aside to dry. The foam on top of the brew is as follows. Whip together 1/2 cup of whipping cream with sugar and gelatin. Whip until it starts to get fluffy then add the other half of the whipping cream. Whip until it is foamy and stiff/fluffy. Set aside. Now the brew. Fill your mason jars with 1/3 ginger ale. Slowly layer in about 1/5 mango juice. The idea is to not let it mix completely with the ginger ale. Next take an eyedropper with grenadine and insert it into the center all the way to the bottom of the drink and squeeze out. You should see layers like the photo above. Take the foam you set aside and spoon some onto the top of your brew enough to cover the top with a layer. Insert your broom! Walla a tasty Witches Candy Corn Brew. You can even add a little candy corn on top of the foam if you like but not necessary.   Today the Colonel is in the Southern Kitchen makin buttery Toffee. For those of you who do not know the Colonel, he is the Entrepreneur of all things Vintage, Time Travel, inventor and the delightful host of www.etsy.com/shop/ColonelSprocket You see the Colonel aided by his lovely wife Charlotte develop all kind of wonderful things for your pleasure. Perpetual Vanilla, Soaps, jewelry, vintage design and the list grows. And as I said today the Colonel felt like Toffee. You see there's a very quaint business that makes toffee in California. However they do not ship toffee in the summer. Why? It melts in the delivery truck. 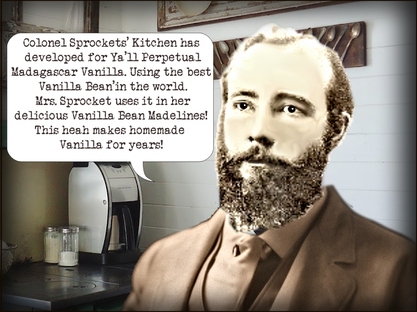 So what is the Colonel to do when he has a yen for Toffee? Well make it himself of course! Using his very own Lovely Perpetual Madagascar Vanilla in it. "We set up a test kitchen today to develop our own toffee heah in Georgia using of course the finest Southern pecans. " Drawls the Colonel. Now for those of you who do not as of yet know it, Colonel Sprockets is a subsidiary of GrafXQuest. Several years ago a friend introduced us to the wonderful photos of the Colonel and his family and we haven't looked back. Going to the Colonel's Link above you can experience more around the Colonel and his family and the wonderful story based shopping experience like no other. Join him for wonderful tales of Time Travel and invention. As for the toffee well we all think that we have developed something mighty tasty heah. And nothing motivates an artist like good Tonks Coffee and Toffee. If you would like to taste the Colonel's Toffee let us know. We would be more then happy to send you a trial sample all we request is the postage. It may be melted though now ya heah? After all it tis summer now. Mmmm Mmmm good! 
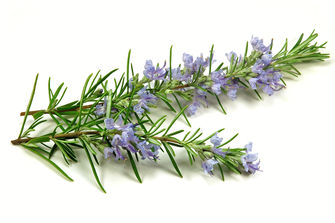
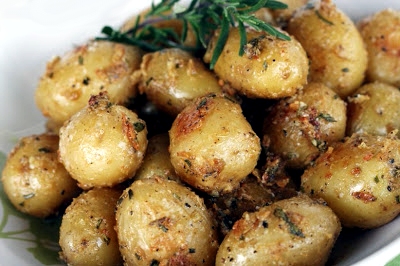
Rosemary supposedly prefers a sandy loam type soil and from what I understand it has a harder time growing up North which is probably why I killed my first one. I had one when I lived in the Chicago area and the poor little thing didn't make it past three months. Now that I live in Northern Georgia I figured I would try my luck again and lo an behold a Rosemary bush was born! So back to pruning. After watering it yesterday and checking it today and it looking much better, I went ahead and pruned it back. The shape I am looking for is about waist high and the branches that are getting heavy and starting to look like they may split or crack off on the sides, I just whack those off. Immediately my little bush looks happy. Check! Now the most important part; harvesting them. Wait I technically just did that. Yep that is pretty much it, you cut it off and walla harvested. Okay now that you cut it off what do you do with it? Well lots of things actually. You can put it out to dry, make sure to spread it out so that all the leaves can get air. Or you can keep it fresh by putting it an air tight container and putting it in the fridge. Be sure to rinse and dry it thoroughly because of the bugs it could have from coming from outside but don't use an anti-bacterial soap it could ruin the properties you want to keep. Now why Rosemary? Well it is really one of my favorite fragrances and possibly one of my favorite foods. Have you heard of Rosemary Olive oil bread? YUM E! Regardless of the delicious tastes the most important thing is have you heard about how great it is for you? It has amazing health benefits and in recent studies scientists are finding it increases your memory; especially those with brain surgeries and problems with short term memory, (guess what that is me) by 75% just by inhaling the natural oils for 15 minutes. You then put it aside and 30 minutes later you repeat. So twice a day. I have started sticking my nose in my Rosemary bush because of this and I will have to tell you how I come along. I will let you know that I was very cloudy and non functioning this morning and it seemed to wake me up at least and I am now able to semi write without my usual loss of focus. Oh did I mention that it is supposed to help you focus too? Wow right? Who knew a tiny little evergreen well actually not technically an evergreen it is from the mint family along with other popular and fragrant herbs such as thyme, oregano, lavender and basil. Here are some other great health benefits our little friend has; Rosemary leaves contain certain phyto-chemical (plant derived) compounds that are known to have disease preventing and health promoting properties. Because of its natural substances which I wont go into here Rosemary has compounds that are known to have rubefacient (counterirritant), anti-inflammatory, anti-allergic, anti-fungal and anti-septic properties. It is rich in many Vitamin B complexes. Which I find very interesting because did you know you need vitamin B for your nerve system and memory? People like me who have brain disorders and migraines are usually low in vitamin B12. I have to give myself an injection monthly for the rest of my life. The fact that the plant is rich in vitamin B may have something to do with the memory increase? Would seem plausible. Our little plant is also rich in vitamin A, low calorie, no cholesterol, and 37% of RDA fiber if you eat 100 grams. Also 37% of RDA for vitamin C. And it contains natural iron. Now thanks to this little bush of mine this morning, my mind seems to be more awake which means I can now hopefully create a Freebie for you for August as well as the daily Freebies. YEA! Right? So I guess I have to say Rosemary not only does the body good, but the mind as well and really I don't mind eating it. And with that in mind ha ha here is one of my own recipes for Rosemary potatoes. Makes a great side dish and is a huge hit with my family.
Now you will add salted butter. The real stuff people its actually better for you then the made up crap look it up. Now depending on how many potatoes you used; 6 use have a stick, 10 use 3/4. Melt the butter in with the potatoes add fresh Rosemary or you can use the dried bottled stuff but if you do add it in with the butter right away so it will start to get soft. BTW they say even dried Rosemary helps with the memory excellent right? Use as much or as little as you want for taste I ad enough to coat the potatoes well. |
About this page.
Life in general is an art and I will show you how to find the beauty in everything you see and do. Subscribe and receive a free weekly download and updates. Archives
May 2019
Categories
All
Are you able to donate a $1 through PayPal to help assist this artist in keeping this extensive site alive. It is all out of pocket and costs over $50 a month to finance. If you enjoy this site it would really help. Thanks in advance! |


 RSS Feed

|
|
©1996-2022 GrafXQuest LLC All Rights Reserved.
|
|