|
Author: Lady T Powers 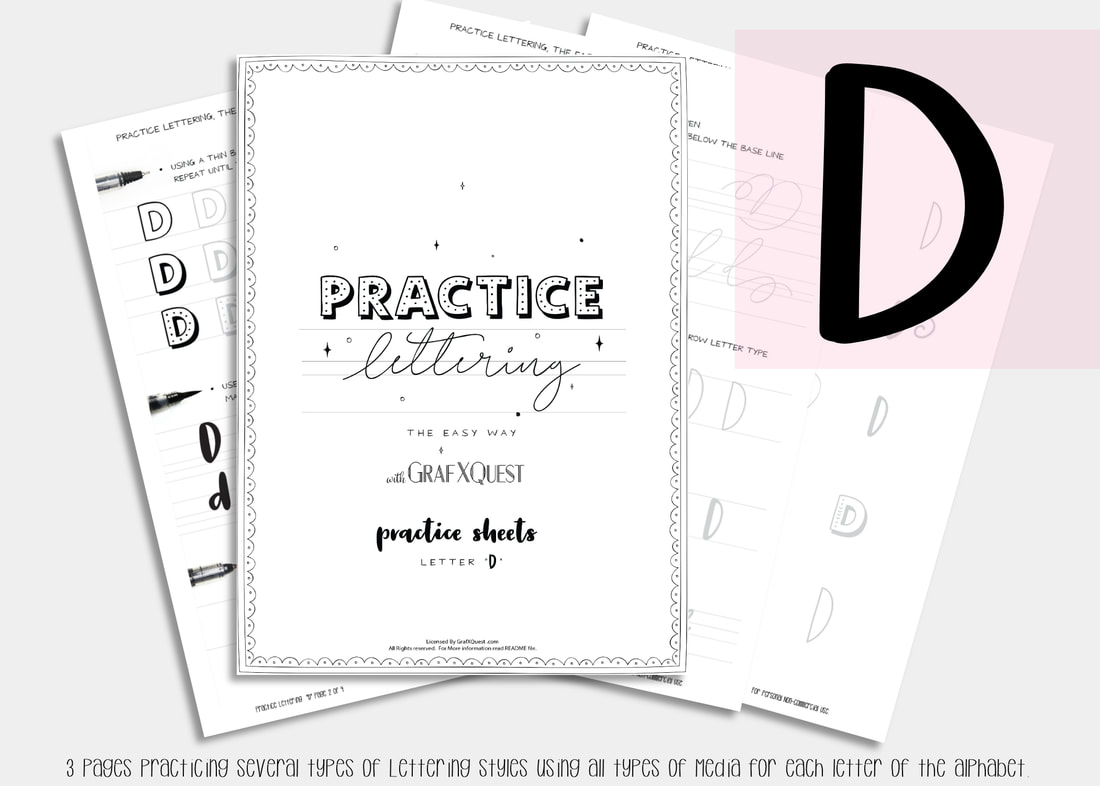 What comes next after C ? right... the letter d! 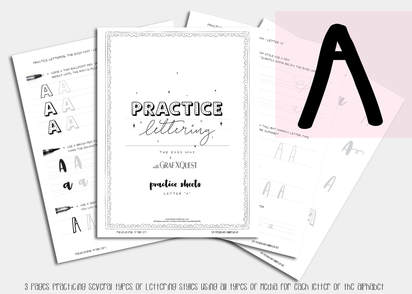 Several posts ago we started you out with some practice sheets so you can start getting the feel of playing with lettering. You will also be able to print those sheets out as many times as you like to have extra space to practice the above lesson. You can get them here: Practice Sheets. You can also see the post you missed on the Letter A here : Lesson A and get the print outs here: Letter A Printouts and Letter B Printouts and Letter C Printouts and now letter D Printouts. Want to share these with someone else? Please do not share our files, instead share our link above to this post. Thanks. Be sure to read the first post for letter A as it will have some important hints to help you along with these lessons. Lets Move on to to the letter D. Following the instructions laid out in our last 3 posts on the letter A, B, and C be sure to print out your letter D files to follow along. The Letter D Lesson will be available free until April 6th 2018, at which point it will then become a $1 to help support the site. All lessons in this blog are for letter formation and tips for learning Hand lettering and may not always apply towards the kit you are working on. However most of these lessons should assist in most if not all cases. Moving along we will assume you now have read the post on the letters A,B, and C and have printed out your D files and practice sheets, and are ready to work! Today we are going to talk about handlettering tools. 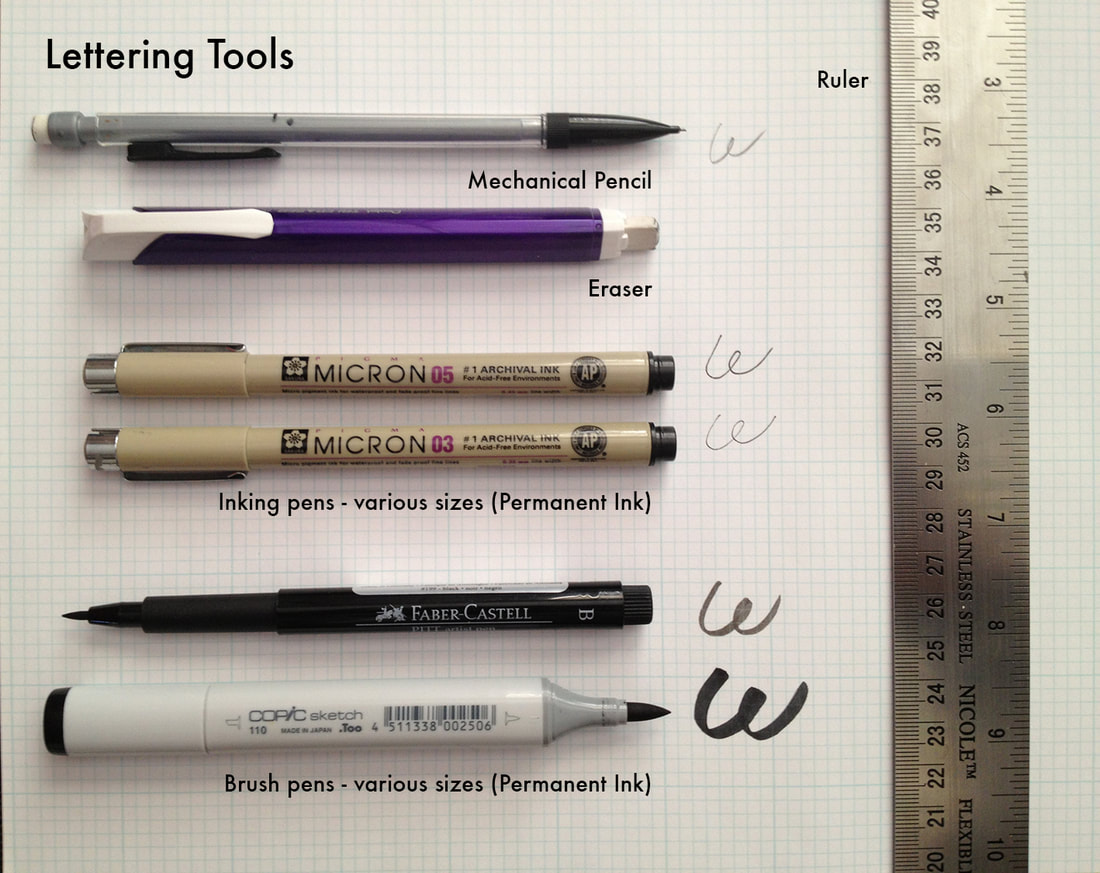 Hand Lettering styles are gorgeous and look so fluent and easy until you try them. All of a sudden you realize you are either good at them or well, just plain stink! However there is good news for you fellow stinkers, anyone can learn it – it just takes practice. I compiled some hand-lettering tips from HOW Design University‘s lettering extraordinaire, Denise Bosler, to help you with your lettering practice. First, you need the right tools, and we borrowed this practical tool guide from Denise Bosler’s Hand-Lettering Power Course. You can either use graph paper for handlettering or even better yet the practice sheets we prepared just for this. Whichever form you use this will help in building on your consistency which we discussed in our previous post with the letter C. Basic Hand-Lettering Tips: Lettering is not the same thing as handwriting. When you are lettering, you are actually drawing the form of the letters. Create a library of inspiration. Browse Pinterest and YouTube as lettering artists frequently publish their work on those sites. We recommend following Denise Boslers Pinterest boards as she always posts fantastic resources for inspiration. But the point is you need reference materials that you can copy or trace over to learn how to build fluidity and your own style. Look to typographic design for inspiration. Denise Bosler advises that “the best way to start [lettering] is by copying from existing typefaces to get to know the feel of the letterforms.” Trace known typefaces, such as Arial, using the grid paper. Pay close attention to the spacing, line heights and widths. Then practice practice practice. Our Letter D comes with several type faces to learn which are consistent with the rest of our alphabet. Try learning those first as there is lots to inspire you and space to learn. Remember to follow the rules of typography. (If you’re new to typography, here’s a handy list of typography terms. Refine, refine, refine. Once you have sketches of your lettering, refine until the letters follow the typographic rules. Refining might take several tries. This is why you need an eraser nearby as you’ll use it often. Always start with a pencil. Use several sheets until you have the perfection you desire before adding your ink. The tools above are merely suggestions and there are more types on the Practice sheets included. One thing I cannot stress enough is practice. With practice you CAN be just as good as the professionals and can use it for so many things. CARDS, TAGS, GIFTS, WEDDING ANNOUNCEMENTS, WALL ART, START YOUR OWN BUSINESS. If you ever had doubts that you can not do it? You are dead wrong. You can do anything your mind sets to if you are willing to put effort into it. Try some of the tools above. Pick up your free copy of letter D today while it lasts. Share your work with us? We would love to feature you. Contact us with what you have done so far and submit your images to us as well as any tips or hints you have found so far in your journey with us. Join us again soon for the Letter E. We hope we have given you some additional insight into hand-lettering. Have fun working with the Letter D. The entire alphabet will soon be ready to purchase as a complete set. Until then we will E you next time! Need Additional Space to practice? Don't forget your calligraphy practice sheets that track the pen type you use and has six brackets set up for practicing whole lines or single letters. See you next time! Thanks! ~ Lady T
0 Comments
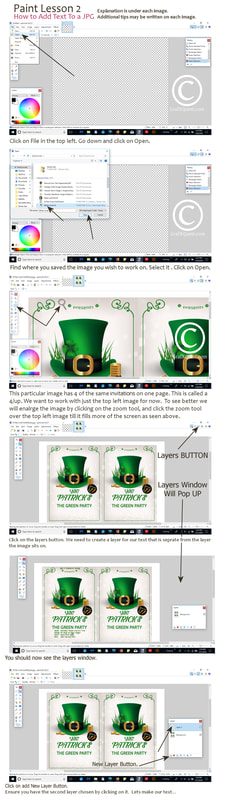
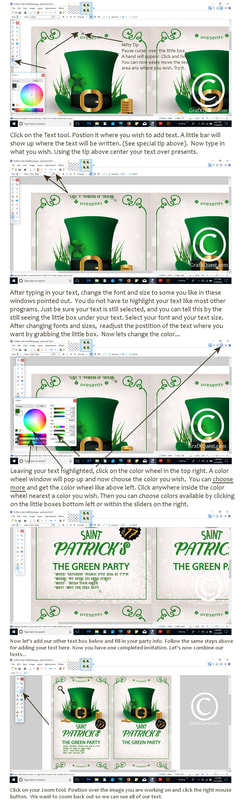
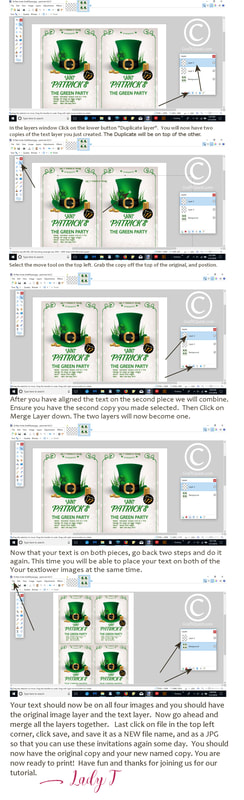
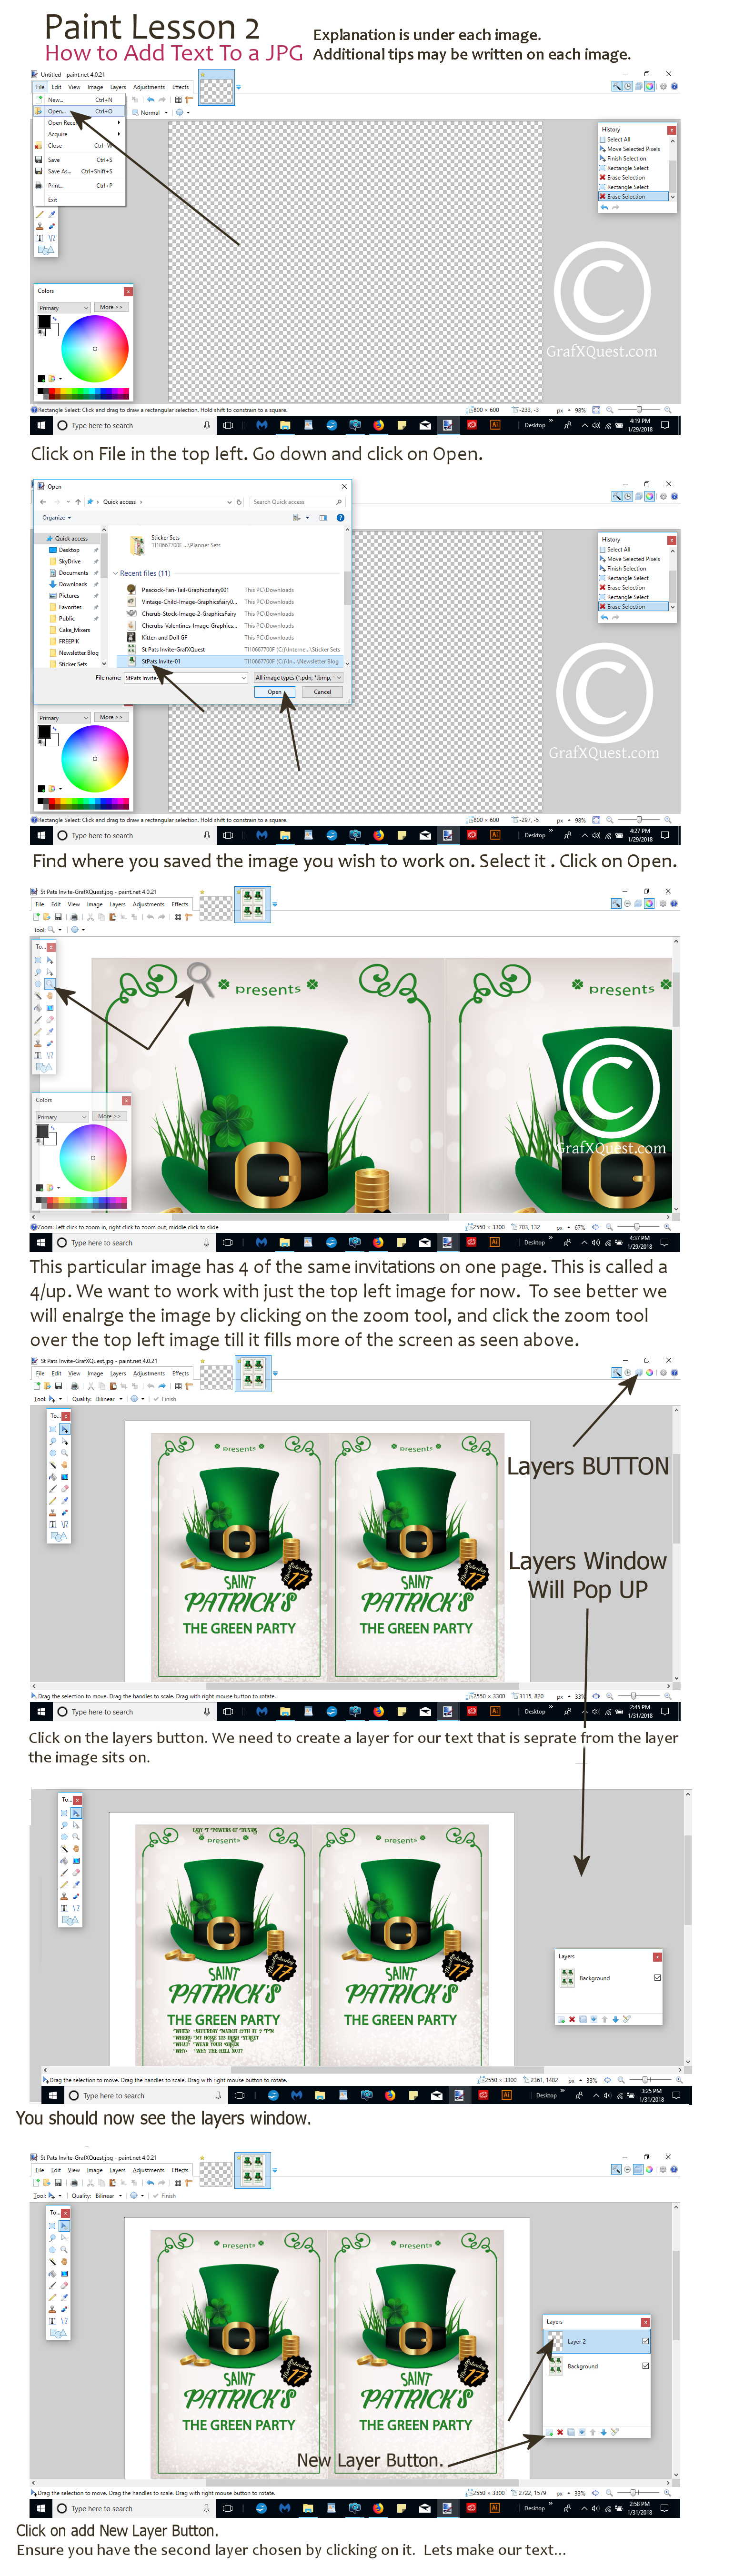
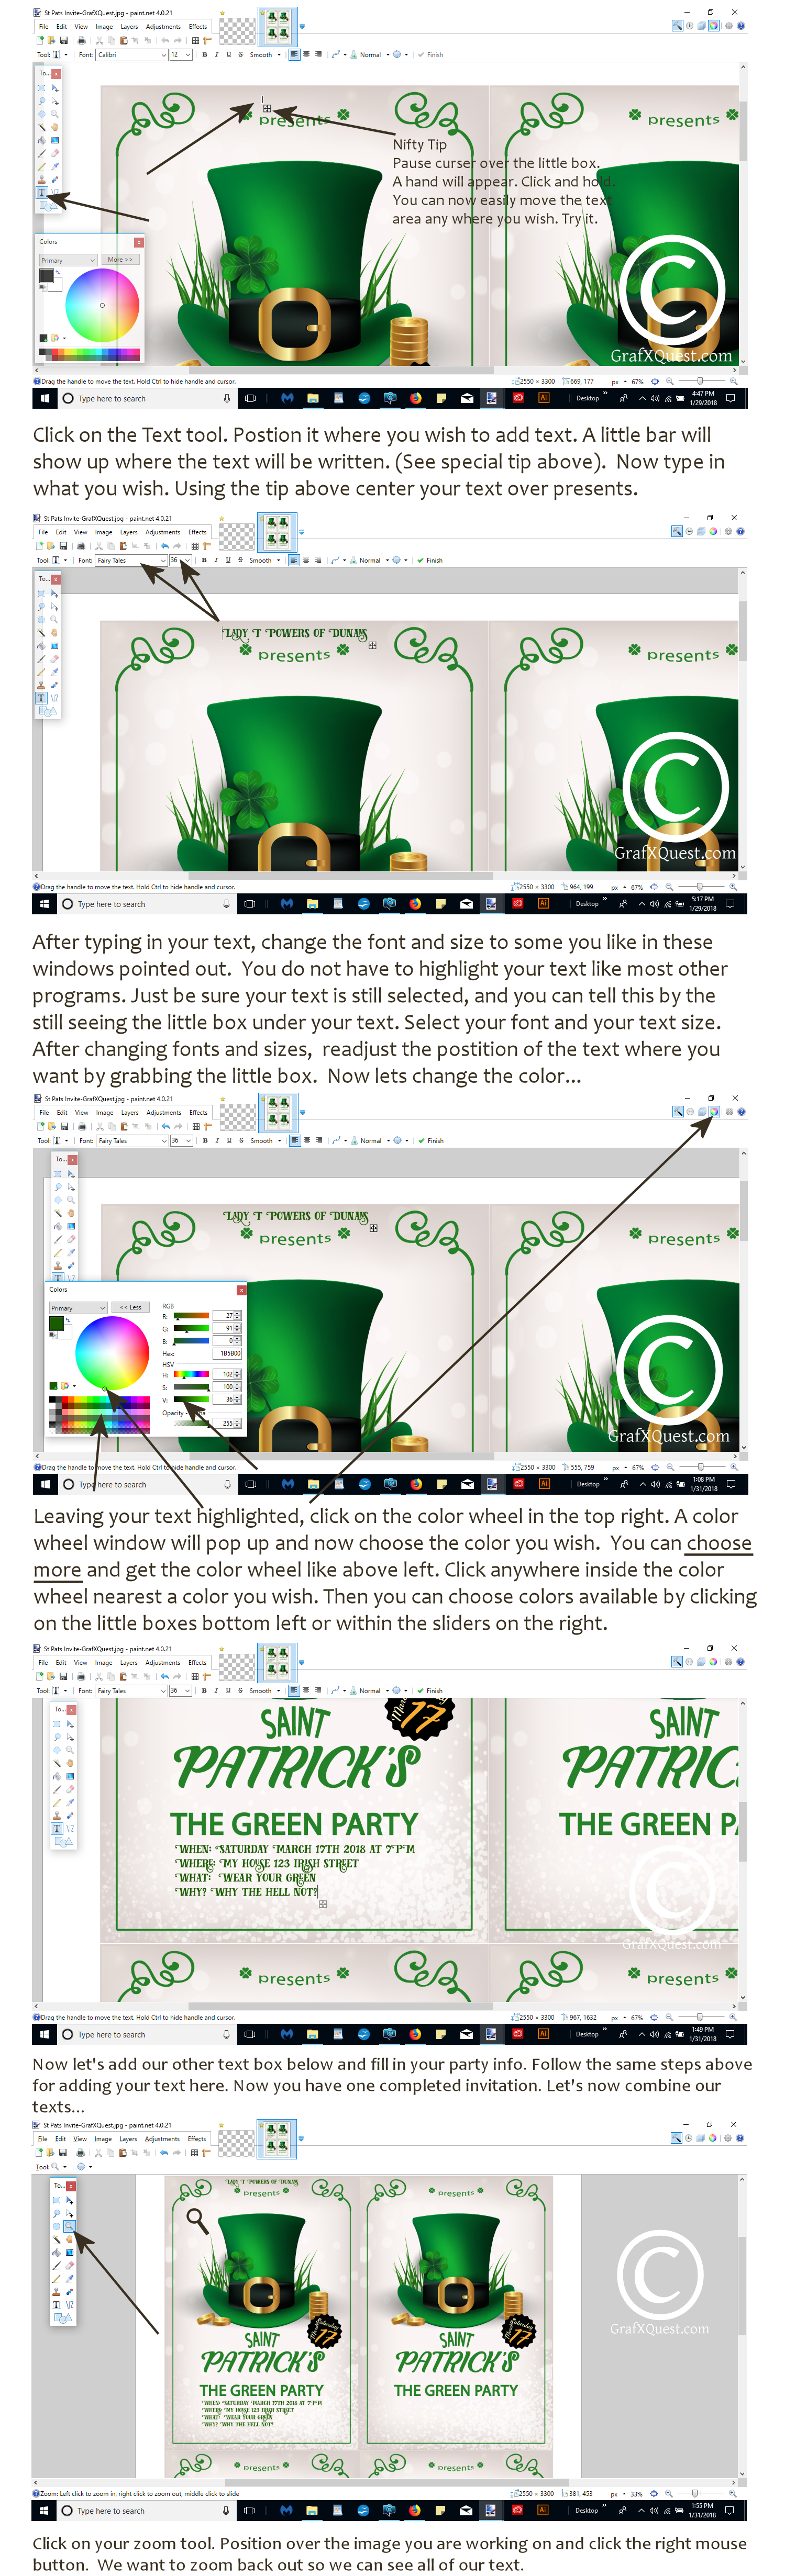
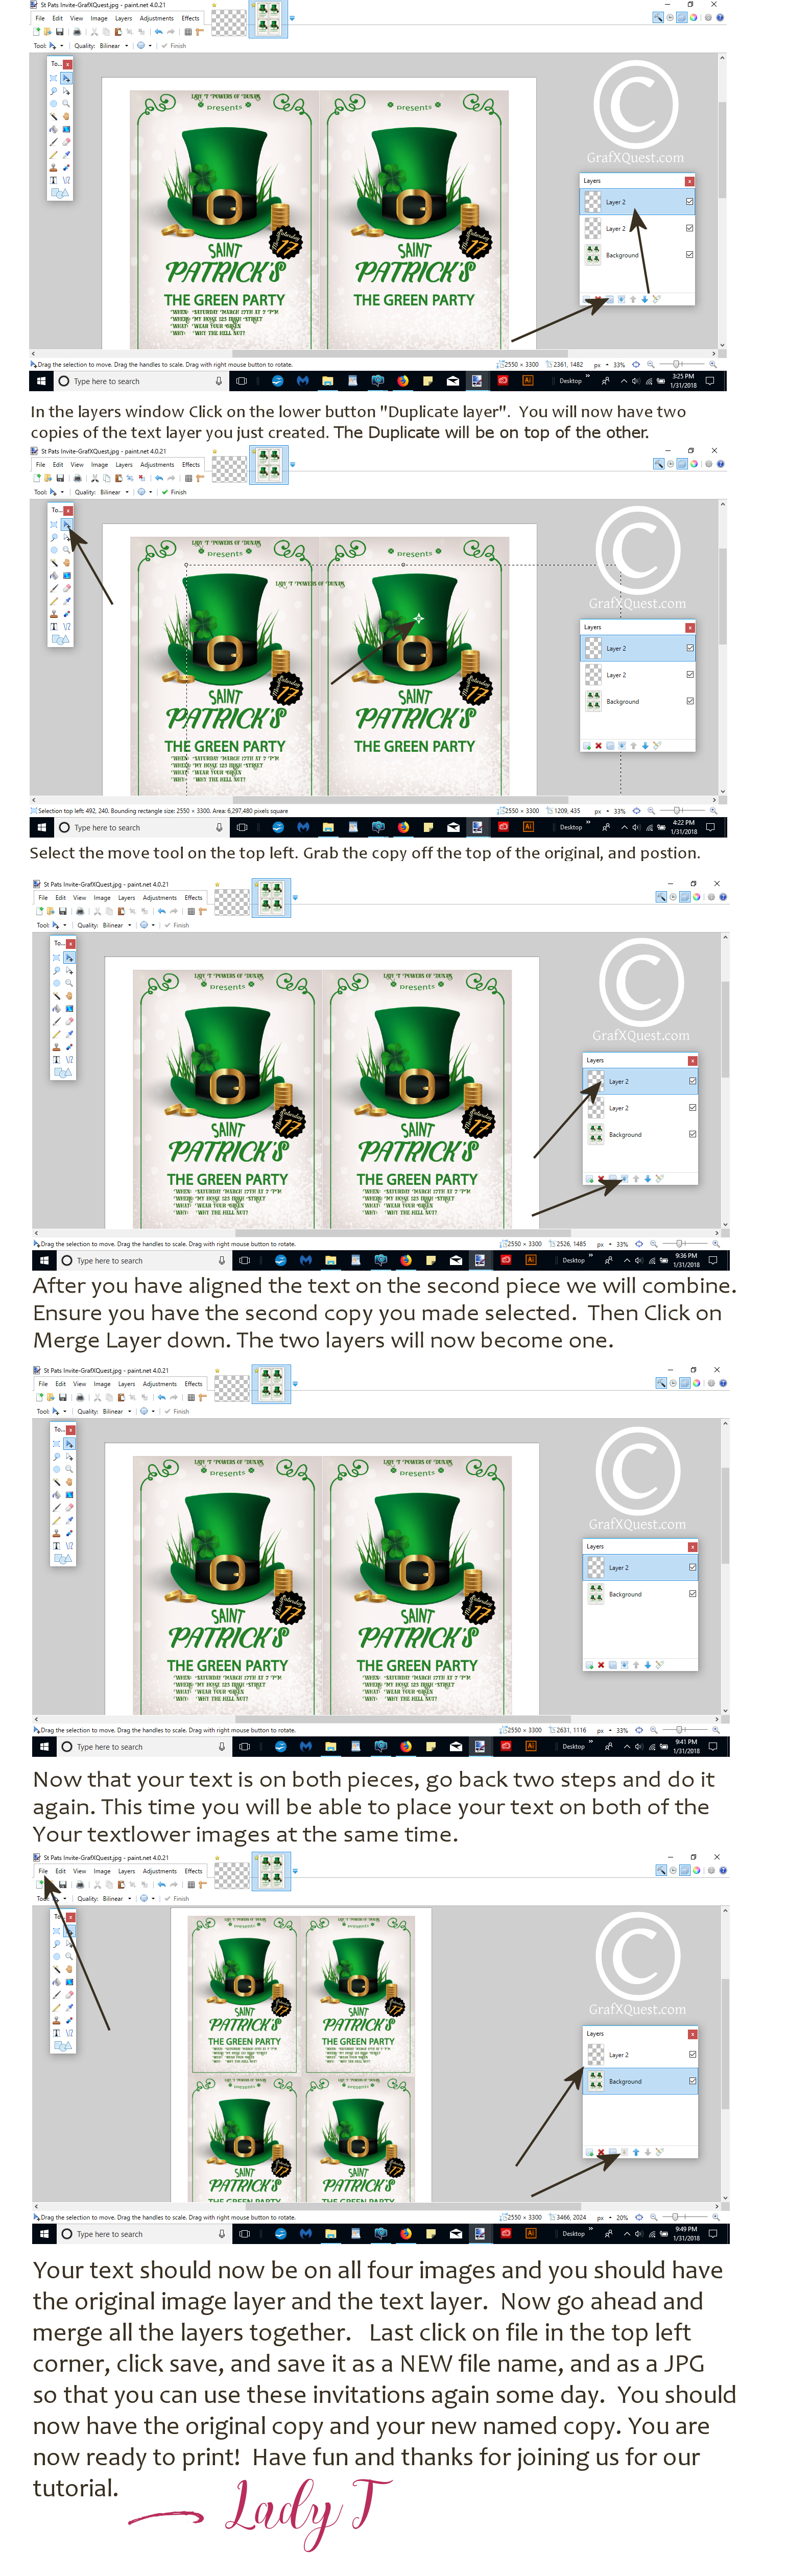
Article By Lady T Powers Hi, today I have for you a nifty little tutorial on how to add Text to a JPG file using PAINT which is a nifty little program that is very powerful and can do a lot of things like Photoshop but you don't need a subscription and you can get it for only $1.50 right now on our site. Using this program I will walk you through how to add Text to a JPG file. Note we will be using an invitation, but this will work for adding text to any JPG file like photos, cards, personalizing stationary and more. This tutorial will also be helpful if you do have Photoshop or Photoshop Elements as some of the procedures are nearly identical. Note the Tutorial will have a Copyright water mark over it and its just for legality reasons and has nothing to do with the lesson. Let's get started! Can't read the images? Right click on each of the 3 file extensions to open in a new tab, center mouse over image you should see a zoom sign, right click and read.
The glue stuck a bit to the wax paper but just only slightly tacky on the parchment which made it a dream to work with. Anyway enjoy the video and tell me what you think! Best Ingredient list for the glues.  Get the Tea Time Envelope here: Tea Time Learn how to put together our Tea Time Envelope hope you enjoy! 
 What do we use on our Freebie page? We use the majority of JPG files and occasionally PNG files. So what are they and why are they safe? Both JPG and PNG files are image files that have been compressed. They are not an executable files that would require you to run anything on your computer nor install a program, they are image files. Every file you download off our freebie page is safe. We have scanned the images ourselves and or opened and reworked them and they have gone through many virus scans before getting to you and once again JPG and PNG file extensions are safe. HOWEVER... This does not mean that in the process of downloading files they could not have passed through some third party trying to do you malicious harm. Never get a file of ours through another site such as Pinterest. It is safest to get it from us directly. So how can you tell if the file you downloaded is safe? If you are SURE it is a JPEG/PNG image (after checking the REAL extension of the file) then it poses no threat. To be able to view files' true extensions you must click "Tools" in the upper left part of any explorer window then click "Folder Options". In there you must go to the "View" tab and uncheck "Hide extensions for known file types". Always make sure that someone has not renamed the .JPG or .PNG to .jpg.exe or .png.exe You can also check the files from where you downloaded them to to ensure no file extensions have been added to them. The likelihood of this is extremely slim. Still not sure? Your virus program can also run a scan on the file. Our Zip files; which you will come in contact with through ours stores is a way for us to package many files together so you only download one file package instead of several. Our Zip files contain a text file, and any of the following; PNG/JPG files, AI files, EPS. AI files are for Adobe Illustrator and EPS files can be opened in Corel, Photoshop and AI. AI and EPS files are vector files that are also image files just like a JPG or PNG but instead these files can be resized in the programs mentioned without losing pixel clarity. AI and EPS files are mostly what are called Vector files. Zip files from us are safe because of all the above mentioned and contain no executable files. Good luck with everything and remember to ponder provenience, size and name of any executable you download before you run it.  |
About this page.
Life in general is an art and I will show you how to find the beauty in everything you see and do. Subscribe and receive a free weekly download and updates. Archives
May 2019
Categories
All
Are you able to donate a $1 through PayPal to help assist this artist in keeping this extensive site alive. It is all out of pocket and costs over $50 a month to finance. If you enjoy this site it would really help. Thanks in advance! |
|||||||||||||


 RSS Feed

|
|
©1996-2022 GrafXQuest LLC All Rights Reserved.
|
|