|
So in case you didn't notice I dragged my feet through November and didn't post anything here in the blog section. To be honest I was super busy setting up a new shop, helping customers, had a birthday, and my dog Kodiak now has Horners Syndrome. I became so busy that I over looked the blog. Not permanently but just temporarily. Sometimes dragging your feet, well at least how I do it I get a lot done but not everything I want. I have been scanning in images for Christmas and the holidays for the freebie page, spoiling my poor dog, and prepping all kinds of things for my stores. Knocked out a painting for my niece and been getting some more supplies to do more art. I got some new pencils among other things and don't know what to play with first. The best part is I will soon be doing video (After the new year) and you will be able to see some of the cool things I am doing and how to's and so much more. In the meantime I have a super cool project for you and I also bid you a happy Chanukah, Merry Christmas and any other Holiday you celebrate around this year. Below I have a nifty way to bring Art to your Christmas or winter to those with no snow.
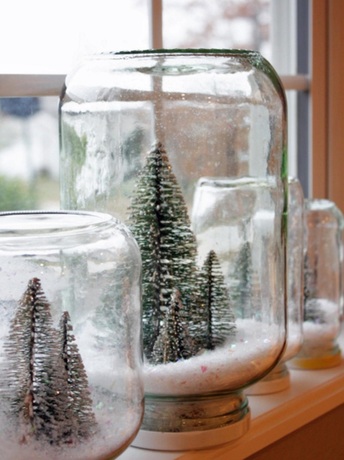
Cutting the foam you can use anything like a steak knife or a jig saw. To make the correct size foam piece lay your lid down and draw a circle around the lid then cut about a quarter inch around inside the circle you drew. This is to allow for space for the lip of the jar and for the fake snow to have room to go. You will be gluing your foam inside the lid and depending how tall your foam is you can stack pieces together and glue on top of each other till you have the height you want. Use a hot glue gun, since some glues eat foam, now you can glue in your winter scene pieces. But before you do think about how you want to decorate. If you drill a hole in the bottom through the cap and foam you can wire little lights into your scene. Using furniture pad protectors by sticking them on top of the cap they become little legs and allow for the wire to feed out from under the bottom of your jar once the lid is on and the jar is resting on its cap. If the cap on your jar is dark you can spray paint it white before you glue anything in. Ok now your scene should be glued in and your cap painted and wired if you wanted. Next we need to add snow to your jar. Again this is something you can pick up at the hobby store. Choose something pretty maybe with sparkles in it. Or natural depending on your scene. There are also many recipes on line for making fake snow. Now lets add it to the jar. You want to fill your empty jar about a quarter of the way full. Slightly less because we want enough to cover your foam and enough to go down around the sides of the foam into the lid. Once you have your snow in put the lid on being careful not to bump your trees and what not. Maybe seal the lid on with hot glue if you have young children and pets. Flip your jar over and walla a winter scene. Shake it around till the snow settles where you want it. Looks like a larger version of a snow globe doesn't it? Beautiful! Well I want to thank everyone that has been stopping in and be sure to share your pictures and comments if you make one of these. We would love to feature you on our DIY page. Talk to you in the next year. We will be getting back to our Herb garden series. Yea! 
Comments are closed.
|
About this page.
Life in general is an art and I will show you how to find the beauty in everything you see and do. Subscribe and receive a free weekly download and updates. Archives
May 2019
Categories
All
Are you able to donate a $1 through PayPal to help assist this artist in keeping this extensive site alive. It is all out of pocket and costs over $50 a month to finance. If you enjoy this site it would really help. Thanks in advance! |

 RSS Feed

|
|
©1996-2022 GrafXQuest LLC All Rights Reserved.
|
|