
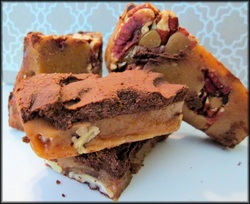
 Yesterday we were experimenting making Toffee. If you didn't get a chance to see the blog about it you can see that here: http://www.grafxquest.com/blog/colonel-sprocket-in-the-kitchen Over all I have to say considering it was the first time making it, it wasn't really a huge massacre but since this is about Inferior designs we have to pick on it now don't we? Ok so here we go. The photo on the right is the final product. The toffee though thick was perfect. The perfect consistency and actually the perfect thickness and texture. I say the perfect thickness because I love Toffee and there is nothing better then MORE Toffee, then Toffee layered with Toffee. The consistency was buttery and crisp and breaks off easy and is not chewy or sticky and melted perfectly in the mouth. I have eaten many Toffees and since it is one of may favorites I would definitely say I would do this again. Now here is what I would not do again. I could have gone the easy route and melted chocolate chips on the top for the chocolate layer. However I do not like the way melted chocolate chips taste melted down and used on deserts. They belong IN a cake, cookie, muffin etc...but really should not be used as a chocolate glaze on top of foods. So I tired to create my own chocolate by making the recipe off the top of my head as opposed to looking it up. Why? Because I love to be inspired and create without help and learn from the mistakes and I like making a mess. So what I had mistakenly done was create fudge. As you can see the in the photo the Toffee has a layer of chocolate fudge on top. So not entirely a horrible disaster as it still tastes wonderful but its not the right chocolate or consistency that should be used on top of Toffee. And I was not striving for a fudge which by the way was a little on the dry side lol. So as not to waste it even knowing it was fudge, I put it on top of my Toffee anyway. I probably shouldn't have done that now that I think about it because the Toffee was as I said perfect and could have stood alone. So the inferior design here was definitely the chocolate on top and will have to be revamped. But here is how I made the Toffee.
The Toffee will start hardening quickly so spread it to the edges fast. While its still hot you want to add your chocolate topping. Now here you are on your own since I messed this step up. You will need some type of chocolate to put on top and like I said some people just melt chocolate chips on top of the hot Toffee. You can sprinkle with more nuts if you like. Then put it into the fridge or the freezer to quicken the setting process. One Hour later remove from freezer, hit yourself in the forehead with the corner of the pan and give yourself a lump. Ooops did I forget to tell you there was another thing that went wrong? Yep part two of the massacre. Well this is inferior design and I am the worlds biggest klutz. Put two and two together and you get one sore forehead. Have you ever seen those cartoons when the character is hit in the head with something and you see his head vibrate and hear a wah wah wah noise. Yep that was me. I was already sporting a Migraine and this was instant vibration right to that source. DOH! Ok after popping yourself in the forehead flip the pan over and the Toffee pops right out with a shake. I did use a non stick pan too by the way. Now juts break the Toffee into pieces. I bust it up by hand. It was easy and didn't need a hammer just some gentle pressure. And walla Toffee...All in all about 15 minutes to make and an hour from freezer to table. Wonderful after dinner treat! If you make this and upload a 5 step process on how you didnt do it like me. I would love to see it and share it in our DIY section. Have a Toffee and Tonk's coffee filled day! Yea! 
2 Comments
|
Archives
February 2015
Categories
All
|
Search the site...
 RSS Feed

|
|
©1996-2022 GrafXQuest LLC All Rights Reserved.
|
|